May 24, 2021
Back to News
Categories:
David's Blog
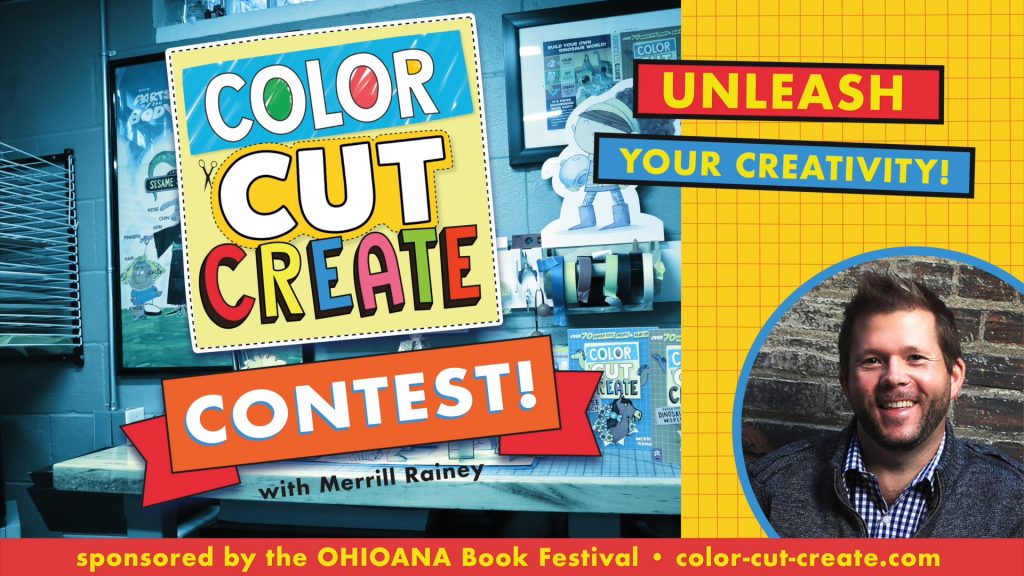
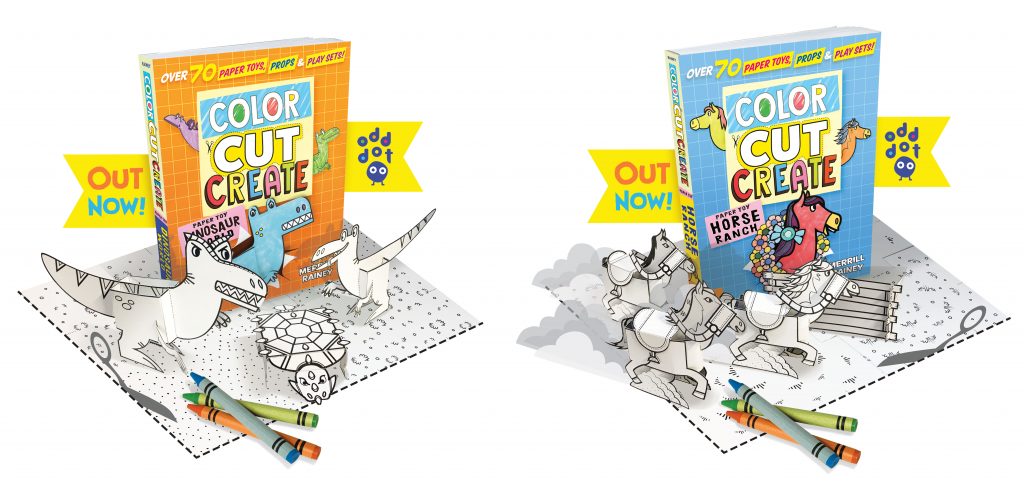
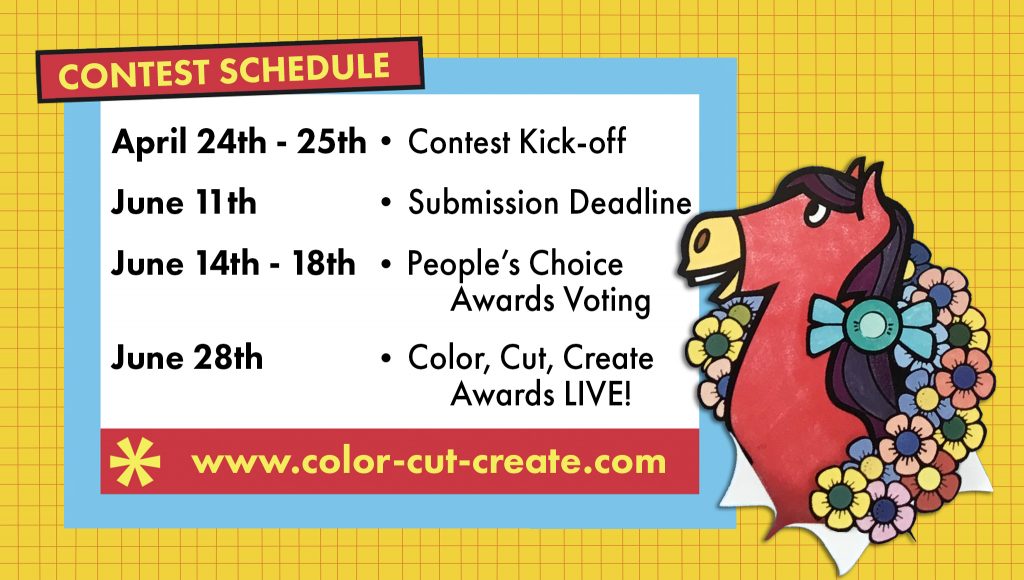
For the virtual 2021 Ohioana Book Festival, we partnered with illustrator and paper engineer Merrill Rainey to create a fun contest for kids featuring his two books, Color, Cut, Create – Dinosaur World and Horse Ranch. The contest kick-off took place during the virtual festival weekend and included a live discussion and Q&A with Merrill. (There’s still time to join in the fun! Visit https://color-cut-create.com/ for contest registration and all the info on guidelines, important dates, and prizes. And be sure to check out the FREE BOOK GIVEAWAY at the end of this blog post!)
While all the young creators are busy making their submissions, Ohioana’s Office Manager, Kathryn Powers, sat down with Merrill to learn more about his books, art process, and inspirations. We hope you enjoy this special blog interview—and the bonus tips and tricks Merrill shared with us, too, that will help make your contest dioramas and stop-motion videos really shine!
Q) Can you tell us about these two fun paper engineering books you featured at the 2021 Ohioana Book Festival?
A) I sure can, Kathryn! The Color, Cut, Create book series is what we call “paper engineering made easy!” And what I mean by that is that each book in the series is designed to allow young creators the opportunity to be able to succeed with minimal directions. The idea for the books came from my own personal experiences with and observations of my own children. On the surface, the books appear to be super cool paper toy books about horses and dinosaurs, but below the surface there is an underlying theme present in each book. That theme is creation based on your imagination. My hope is that once each book gets built, it will not only educate the user with some basic knowledge of paper toy construction, but also inspire them to keep creating! These books are just a starting point, or in other words a means of inspiration!
Whenever I speak to young creators about the Color, Cut, Create series, I always like to leave them with a final question… Now that you have everything created, what else is missing to help bring your project to life?
Q) What inspired you to become an illustrator and paper engineer? Was there a specific book or artist that sparked your passion?
A) As far as I can remember, I have always loved art. As a kid, I would spend a lot of time on the weekends crafting with my mom, and drawing monsters, wizards, and mythical creatures with my brothers. Most of my drawing skills as a kid started from just tracing my favorite comic book characters (Teenage Mutant Ninja Turtles, Batman, and Spiderman) until I was good enough to draw them free-hand.
During high school, I dabbled a lot with different art mediums, but when I look back at it, I was influenced the most by impressionistic painters like Monet, Van Gogh, and Matisse.
It wasn’t really until college that a professor of mine, Doug Goldsmith, introduced me to an author/illustrator by the name of Chris Van Allsburg. I fell in love with Chris’ use of storytelling, his technique, the design of his illustrations, his use of color, and how he used value in his black and white illustrations.
My interest in paper engineering didn’t come into play until after I had started my first job out of college. I came across a paper toy artist by the name of Matthew Hawkins (http://matthewmadeart.com). At that time, Matthew was creating and posting a new downloadable paper toy every week. Each week I would download and build them, thus beginning my love of paper engineering. Matthew’s creations inspired me to research more about paper engineering and eventually, once I felt comfortable enough doing so, I started designing my own paper toy creations.
Q) That leads perfectly into our next question! Your paper toys are so detailed, and there is such a variety of figures and accessories for kids to craft. How do you design your build-able creations?
A) First, I start with creating a plan in my notebook. My notebook is where I always jot down ideas and how I think they will work and function. I create multiple small sketches (called thumbnail sketches) until I have my idea just right. From there, I take my thumbnail sketches into a software called Adobe Illustrator. In Adobe Illustrator I refine my sketch into what is called a die-line. A die-line is a line drawing of your art that acts kind of like a cookie cutter, but for paper. The die-line lets me, or a machine, know where to cut out the paper shapes that will eventually form a paper toy.
From there I keep making prototypes until it’s just right. Sometimes it can take multiple iterations just to figure how to make one toy work.
There are three things that I always like to mention to young builders that I keep in mind when creating paper toys. These are Creativity, Ingenuity, and Stability.
1. Creativity: What ideas do you have? This is your brainstorming stage. This stage has no limits. It’s your opportunity to come up with the coolest toy ever.
2. Ingenuity: Once you have all of your creative ideas formed, now you need to figure out the best way possible to build them.
3. Stability: One of my biggest pet peeves as a kid was having a toy that couldn’t stand up on its own. So, I always like to emphasize how important it is for future toy makers that whatever you create, it has to be balanced enough to keep from falling over when you set the toy down.
Q) That was always a pet peeve in our household, too—no one wants a toy or figure that falls over or has to be constantly propped up! Now that we know how your books and paper toys are designed, let’s talk about the contest assignment. As a reminder for readers, kids 5-8 will be creating and photographing a diorama of their dinos or horses from Color, Cut, Create, and kids 8-12 will be making a stop-motion video. Can you give us any tips or tricks to make an extra-awesome diorama or animation for the contest?
A) Three things that I touched on in our kick-off video that I really think can help your project be extra, extra awesome are:
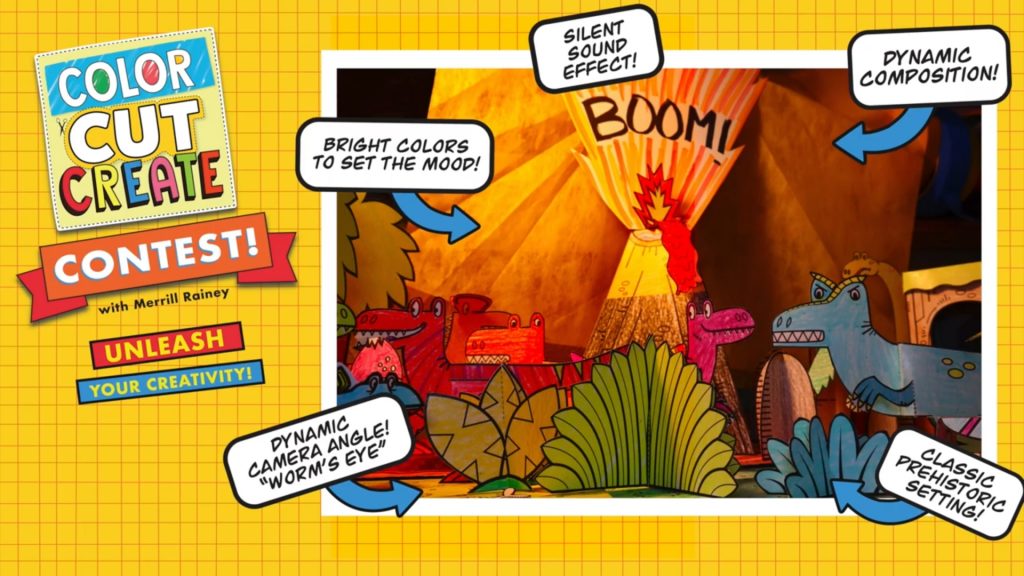
1. Using interesting props and background objects (trees, bushes, clouds, ground cover, extra animals, character costumes, etc.). These can really give your audience a sense of place (setting), and what your story might be about. These visual clues are such an important part of storytelling. As an example . . . what if your Dinosaur jungle includes skyscraper buildings that are tucked in between the trees? What would adding those large buildings tell your viewer about this particular jungle?
2. Lighting is another great tool for storytelling. If you place a light close to an object you’ll get an elongated shadow, or if you have the light high above an object you will get a smaller shadow. The length of shadows can really tell what time of day it is, or add some extra drama to your project. For example, elongated shadows usually indicate sunrise or sunset. Most people see sunsets as a goodbye scene as it indicates the end of the day. So, envision that your best dino friend is moving away and the sun is setting in the background. Similarly, people will see sunrise as the start to a new day. Envision the sun rising as your horses start out on a new journey. Smaller shadows usually indicate midday, as the sun is higher in the sky. Most people will agree that the sun is the hottest when it is the highest in the sky, so the phrase high noon comes to mind. This particular lighting technique is great for indicating a hot day. Maybe your dinos and horses are crossing a hot dessert (maybe a wasteland) and there is no water in sight. The sun would be high in the sky beating down on them. Or maybe it’s a hot summer day, again the sun is high in the sky, but this time your horse’s or dino’s ice cream is melting. I bet they can’t wait till sunset, when the temperature will be just a little bit cooler and they can finally enjoy their ice cream without it melting!
3. Whether you are animating or not, the use of camera angles is such a great way to add visual interest to your projects. If you are animating, camera angles can help with the pacing of a story. A simple close-up of a character placed between your bird’s eye view scenes can really enhance your project. You can re-watch the contest kick-off video for camera angle inspiration.
One last thing that I think is important when taking a photo or shooting a stop-motion animation is the use of a tripod or easel (or maybe even a stack of books) to create a stable base or stand of some sort for your camera or tablet. Having a steady hand when photographing is not always an easy thing to do, but having a tripod or some kind of camera support will give your device extra stability. Having a stable device will help your photographs look less blurry, and your stop motion animation will appear smoother.
Q) Any other advice for the contest participants?
A) Let your imagination run wild with this project! There are limitless possibilities of ideas and things you can create based on each of these books. But before you do anything, be sure to make a plan. And if you need help with figuring out how to build or animate something, just ask a sibling, friend, parent, or another family member if they can help. I guarantee that once they see what you are working on, they will want to join in on all of the fun!
Seeing some of the contest entries in-progress pictures on social media has really inspired me! I can’t wait to see what each and every one of our young creators come up with! Kathryn, to you and everyone at the Ohioana Book Festival, THANK YOU for hosting the contest and inviting me to be a part of this year’s event!
A big thank you to Merrill for giving us this behind-the-scenes peek into his creative life with this insightful interview, and for partnering with us to bring young creators this exciting contest!
If you want to join in and have the opportunity to win a FREE copy of either Color, Cut, Create – Dinosaur World or Horse Ranch, please leave a comment on this blog post OR comment on and retweet our contest Twitter post by midnight (Eastern time) on 5/27/2021. Good luck!
We CAN’T WAIT to see everyone’s submissions! Happy creating!